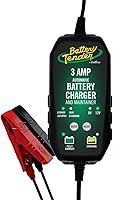
How to Connect a Battery Charger to a Battery
To connect a battery charger to a battery, clamp the red lead to the positive terminal and the black lead to the negative terminal or a ground point, checking the voltage setting first. Set the charger to 6V or 12V for your battery, confirm the polarity is right, and only then turn it on.
On this page (9 sections)
- Is it safe to connect a battery charger to a battery?
- What do you need before you start?
- How to connect battery charger to battery, step by step
- How do you set the charger for 6V and 12V batteries?
- How do you connect a charger when the battery stays in the car?
- What do the charger lights and settings mean?
- How do you disconnect a charger safely?
- Which mistakes cause most failed charges?
- What should you do after the charge is complete?
To connect a battery charger to a battery, clamp the red lead to the positive terminal and the black lead to the negative terminal or a ground point, after checking the voltage setting. Set the charger to 6V or 12V for your battery, confirm the polarity is right, and only then turn it on.
The order matters more than the strength of your grip. A good connection, a correct voltage setting and the right clamp sequence do more for a safe charge than any extra feature on the charger.
Is it safe to connect a battery charger to a battery?
Yes, it is safe when you match the voltage, hook up the clamps in order, and charge in a ventilated space. These steps remove most of the risk.
First, check the charger's voltage. Many units do both 6V and 12V, but they don't always start on the right one, so set it yourself before touching a lead to a post.
Keep the battery in a spot with open air around it. Charging can release gases from a lead acid battery, and a spark near those gases is the real danger.
If you ever smell a strong sulfur odor, see swelling, or the battery gets hot to the touch, stop the charge at once. Our guide on whether a battery charger can cause a fire covers the warning signs.
What do you need before you start?
Gather safety glasses, dry work gloves, a clean rag and a charger rated for your battery before you open the hood. A few minutes of setup prevents most mistakes.
Wipe the top of the battery so dust and moisture don't sit under the clamps. Then check that the posts and clamps are clean; loose grime can stop the charge from reaching the battery.
Look for corrosion at the terminals, which shows as a white or green crust. Clean it off before clipping on, or the charger will read a false voltage.
Check the charger's leads for cracks and make sure the plug reaches an outlet without strain. If the AC cord is damaged, don't use the unit.
How to connect battery charger to battery, step by step
Red first, then black, then check, then power on is the whole sequence. Keep it in that order every time.
- Turn the charger off and unplug it from the wall.
- Attach the red clamp to the positive battery terminal. Most batteries mark it with a plus sign, or the post is wider.
- Attach the black clamp to the negative terminal, or to a solid metal ground point on the frame.
- Wipe your hands and check both clamps are tight and not touching each other.
- Plug the charger in and switch it on, then confirm the voltage setting matches the battery.
- Watch the charger for the first few seconds to make sure it doesn't show a fault light.
A firm grip on each post is enough. You don't need to force the clamp or rock it back and forth, which can loosen the post.
If you want the same process for a storage charger, our walkthrough on how to connect a battery maintainer covers the ring-terminal method too.
Clamping positive and negative terminals
The red clamp goes to the positive post and the black clamp to the negative post when the battery is out of the vehicle or you're charging it in place on a bench.
When the battery is still in the car, many techs prefer to clamp the black lead to a distant ground point on the engine or frame instead of the negative post. It keeps sparks away from the battery top.
Never let the two clamps touch each other once they're attached. That is a short circuit, and it can damage the charger or the battery.
How do you set the charger for 6V and 12V batteries?
Set the charger to match the battery's label, which is printed on the top or case. Most cars use 12V, while some older motorcycles and garden equipment use 6V.
If the charger is fully automatic, it often detects the voltage on its own. A manual charger will not, and a wrong setting can overcharge a 6V battery or fail to charge a 12V one.
A 10 amp battery charger suits a fast top-up on a big car battery, while a lower-amp unit is easier on small batteries. Match the amperage to the battery size rather than the other way around.
A 6A charger is plenty for maintaining a car or charging a motorcycle battery overnight.
How do you connect a charger when the battery stays in the car?
Use the positive post and a ground point on the vehicle, not the negative post, and keep the ignition off. This method is standard practice and keeps sparks away from the battery.
Find a bare metal point on the engine block or frame, away from the fuel line and moving parts. Brush a small spot clean so the clamp bites into metal, then attach the black lead there.
Keep the charger body on a dry level surface away from the belts and fan. Route the leads so nobody pulls them loose while the hood is up.
If your car has a stop-start system or a battery sensor on the negative cable, avoid clamping directly to the general negative post area, as the sensor can read the input wrong. Use the manufacturer's designated charging point instead.
What do the charger lights and settings mean?
A red fault light means stop, while a green or steady charging light means the unit is working. Read the labels on the front panel before changing anything.
Common indicators include reverse polarity, which shows as a fault or flashing light, and "full" or "float" when the charge is complete. An automatic charger will drop from full amperage to a low trickle once the battery fills.
If the charger keeps restarting or trips its breaker, unplug it and recheck the connections. A loose clamp, a worn battery or a poor outlet are the usual causes.
How do you disconnect a charger safely?
Turn off, unplug, then remove the black clamp first and the red clamp last. This order matters because it keeps any arc away from the battery posts.
Leave the clamps off the posts before you coil the leads. Put the charger somewhere dry, and don't wrap the leads around a hot engine or sharp edge.
If you plan to store the battery, check the voltage after a day of rest. Many chargers drop the battery to a float level on their own, but a maintainer does that job better over weeks.
How to connect a battery maintainer to battery
A maintainer hooks up exactly like a charger, but it stays connected for weeks. That's why a slow, smart charger is better than a fast one for storage.
A small maintainer adds roughly 1.25 amps, which is enough to hold a healthy battery at full charge without cooking it. The unit stops and starts on its own as the voltage drifts.
For seasonal vehicles, install the fused ring terminal on the battery so you don't need to open the hood for every connection. A sealed connector off the front bumper keeps the whole job to seconds.
Owners often ask whether a trickle charger and a maintainer do the same thing. Our piece on the trickle charger vs battery maintainer difference explains why the smart float behavior is the part that matters.
Which mistakes cause most failed charges?
Loose clamps, a wrong 6V or 12V setting and clamps touching each other are the three causes of most dead batteries that stay dead. Each one is easy to spot.
Another common mistake is charging a frozen battery. Let it warm to room temperature first, because charging a frozen lead acid battery can damage the case.
Don't leave a manual high-amp charger running unattended for many hours. A smart charger manages itself, but a basic box needs you to watch the clock.
A battery that stays flat after a full charge is a sign the battery itself is worn out. Check its age before blaming the charger.
What should you do after the charge is complete?
Check the resting voltage, tighten the terminals and test a start before you put the tools away. A healthy 12V battery reads about 12.6V after it rests for a few hours.
If the voltage is right but the car still cranks slowly, the problem may be the cables or the starter rather than the battery. Clean the terminal posts and retest.
Put the charger back on its shelf with the leads untangled. Inspect the clamps for corrosion once a season and wipe them dry.
Finally, run the charger every few months on a stored battery. Knowing how to connect battery charger to battery is the skill; using it on a schedule is what keeps the battery alive.
If the battery is more than 4 or 5 years old and keeps dropping, plan a replacement rather than chasing another charge.
Frequently asked questions
Can I connect a charger while the battery is still in the car?
Yes, for most cars you can leave the battery installed. Use the vehicle ground point for the black clamp instead of the negative terminal, and keep the ignition off.
What happens if I connect the clamps backwards?
Most modern chargers have reverse polarity protection and will refuse to start. Cheap or older units can blow a fuse or be damaged, so check the red and black clamps against the marked terminals before switching on.
Do I need to disconnect the charger before removal?
Yes. Turn the charger off and unplug it from the wall, then remove the black clamp first and the red clamp second.
Reversing the removal order keeps the risk of a spark away from the battery posts.
How long does it take to charge a car battery?
A 6 amp charger typically needs around 10 hours for a car battery, while a 4.3 amp unit like the CTEK takes much longer. A 1.25 amp maintainer is for topping up and storage, not fast recovery.